Chesterfield French Braid p2p (2) $14.00 USD
A French Braid pattern which will sew continuously!
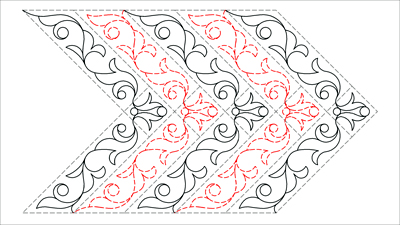
There are two patterns in the set - and both designs are the same, but one has been flipped in order to sit as it should when being placed with the p2p function. For the design to sew continuously these two patterns need to alternate.
This is very easy with machines which have a concatenating feature (which means the chosen designs can be placed sequentially as you go). However if you do not have such a machine these patterns can still work for you by placing the designs individually, snapping them together and then setting the sewing order.
The actual designs (the two below the main image) look a little wonky - but that is what is required for them to function as point to point patterns - the start and end has to be on the same horizontal.
From Donelle, who requested this pattern:
'Oh my goodness!! I am thrilled with how the design is looking on the quilt :)
It is easy to use, stitches out perfectly and is exactly what I needed. Thank you so much!
Now I want to make a French Braid quilt that I can keep - just so I can use the pattern again!'
'Oh my goodness!! I am thrilled with how the design is looking on the quilt :)
It is easy to use, stitches out perfectly and is exactly what I needed. Thank you so much!
Now I want to make a French Braid quilt that I can keep - just so I can use the pattern again!'
Design Features
- the registration points are at the widest part of these wide braids for stability.
Quilt Gallery Examples
- French Braid: this pattern is used in the braid parts of the quilt
Tips & Info
- Contatenating machines:
- select the pattern which is more like an arrowhead going up, and then select the pattern with the arrowhead going down (for Statler Stitchers hold down the control and shift keys while making the second selection)
- you will then be zigzagging your way from left (of the centre square) to right (of the centre square) all the way up the braid, clicking first on the lowest tip of it and then across to where the highest tip of it is on the other side ... then onto the highest tip of the next one on the other side...
- for you, there will be no snapping of ends together or setting the sewing order required, that will all be done as you go. - Non-contatenating machines:
Starting with the design which is more like an arrowhead going up
- click on the lowest part of the edge of the braid which is to the left of the centre square
- then click on the highest part of the braid which is out to the right of the centre square.
- Stop, miss a braid and repeat for the next one - then repeat this until you can go no further.
Using the design which is more like an arrowhead going DOWN
- click on the lowest part of the edge of the braid which is to the RIGHT of the centre square
then click on the highes part of the braid which is out to the LEFT of the centre square
- stop and miss a braid (which already has a design placed in it) and repeat for the next braid - repeating this unti you can go no further.
Snap the ends of the patterns together
Set the sewing order - Please feel free to write to me if these instructions do not make sense!!
Other patterns of this type can be found by searching for
Blocks: p2p, BraidsThemes: p2p, Swirls & Curves
Items in Set


Additional images for this item
Quilting Gallery Examples (click on image to go to this item)
